Our layout means how the structure of a graphic design visually looks. It then concerns the position of, for example, the text or image on the page, the layout in columns, where the images are, et cetera.
The color, font and margins are in the theme, it is linked to the layout. A good layout ensures that the information is easy to recognize and read. The layout is therefore strictly distinguished from the content.
Each page can have one layout. The layout provides the website with the fixed elements. An example of this is, for example, the footer that appears in a website. If we want to return it to many pages, it is useful to make a layout for it. This is then linked by you to the page that you want to provide with this information.
• In the main menu, select Websitemanagement 2.
• Click the Layout item in the submenu.

| Add | New layout | |
| Standard Layout | Standard layout | |
| View | View layout | |
| Edit | Change layout | |
| Delete | Delete layout | |
| Properties | Layout properties |
We use a live website demo to show what happens on a page if you create or change a lay-out and text:

The upper bar shows a summary of your lay-out with your name, type and width.


All changes to the layout editor are done in draft mode. This means that an adjustment can not be seen live on the website.
• You can view the concept in the meantime via the View concept button.
• Use the Publish button to show the page changes online.
• If you want to undo the draft adjustments, you can click the Undo button.
Underneath the upper bar are two green blocks; add new widget and add new row.


You can see a few rows in the lay-out screen. These rows can be divided in 12 columns max. These colomn deviation doesnt have to be the same as the rows above.

After creating a new lay-out, adding the rows and linking a theme, we will dress up the layout. This is done in e-Captain using widgets. e-Captain contains many different widgets. You can drag a widget to a column to place it there. For example, if you want to write a piece of text, drag a Text widget to the appropriate column and a text editor will appear where you can write the text. If you want to put an image in a column, drag an Image widget to the right place.
Just below the navigation bar there is a line with two green blocks, New widget and New row.


Click on the widget you want to use in your layout. In this example, a Text widget is added to the column.

The theme you have created is currently linked to the layout. As a result, the theme is taken over by the underlying rows and columns. It is possible to specify a different theme on a separate row or a separate column within a row.
This is the standard layout theme that is set when the new layout was created. The teme is an obligatory field when creating a new layout.
If you want to change the theme of an existing lay-out click Settings in the navigation bar of the lay-out.


To change the theme of a row/column within your layout, click the ![]() icon on te lower rightside of the concerning row/column.
icon on te lower rightside of the concerning row/column.

In the pop-up that opens, depending on how many columns your row exists upon, you will see a number of options for linking a theme. In the example above, we use a row that is divided into 3 columns.
• By linking a theme to Theme full row, the theme will be implemented on that separate row.
• By linking a theme to Theme column #, the theme is applied to that separate column within that row.

This makes it possible to use different themes within the created layout.
It is possible to move the individual rows within the layout.
• Move your mouse to the row you want to move.
• A menu appears at the bottom right of the row. 
• Click on the ![]() icon and hold down the left mouse button. Now you can move the row within the layout. Widgets that are placed in an existing row that are moved along.
icon and hold down the left mouse button. Now you can move the row within the layout. Widgets that are placed in an existing row that are moved along.
• Release the left mouse button at the location where you want to place the row within your layout.
You can also move widgets within the layout. Widgets can be moved within the row, but also to another row. Multiple widgets can be placed in the same column.
• Move your mouse over the widget you want to move.
• You will see that the mouse pointer changes to an ![]() icon.
icon.
• Hold down your left mouse button and drag the widget to a column where you want the widget in your layout
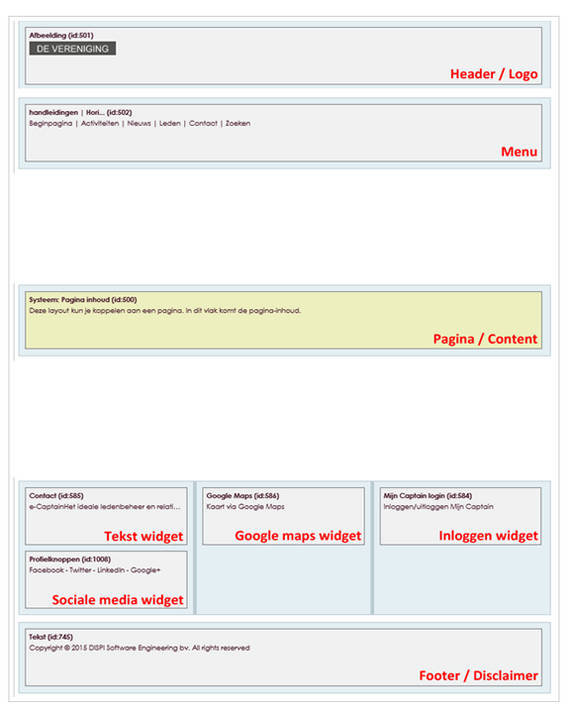
When creating a new layout, e-Captain adds a row. The row System: page content matters. The layout you create can be linked to a page. In this row comes the page content that you can create under the item Pages.

In the image below (move mouse over image) you see a basic layout of a website. From the top down:
• Header / logo
•Menu
• Page / content
• Company information / Login
• Footer / disclaimer